Wednesday, March 30, 2011

sweet, smokey & zesty vegan sloppy joe's

ate the heck outta that vegan joe!
so rich & yummy. 
ah-sloppy joe, ah-slop-ah-sloppy joe   (lunch lady? adam sandler? come on!)


i love delicious, healthy, accessible food. making it, eating it, sharing it. all of it. having said that, there are some foods i'm more psyched about than others. let me tell you, i'm f-ing excited to talk about this sloppy joe recipe.
a while back, i had a party and wanted to create vegan sloppy joes to serve. i wanted some guidance, and i found a recipe for vegan sloppy joes - but they used tempeh, which is a grain based vegan "meat"ish food...but it's really grainy, larger granules, i've never been a huge fan...so i'm glancing at this recipe thinking "why the hell wouldn't they use TVP? it'd be perfect to simulate the texture of ground meat, and would soak up the flavor as it rehydrates, and smoked paprika would be awesome, and beer!..." bam. done. made my own recipe and now i'm sharing it with you. because i'm a giver. it's a blessing and a curse.
this recipe is as easy as...insert inappropriate analogy here. ie: a cheerleader on prom night.  and fyi - at the aforementioned party, everyone loved the joes, vegans and carnivores alike.

ingredients:
- 1 tbsp oil (vegetable oil is fine)
- 1 small onion (chopped nice and small, think about making it the size of a corn kernel)
- 1/3 to 1/2 average bell pepper (chop same as the onion. hate bell pepper? don't use it, won't hurt.)
- 2 garlic cloves, minced or microplaned
- 1/2 tsp smoked paprika
- 1/2 tsp black pepper
- 3/4 cup (6 oz) beer  (what to do with the rest of the beer? enjoy responsibly)
- 1 tbsp apple cider vinegar (if you have regular vinegar, use 1/2 that amount. note - i like my joes zippy, tangy to balance out how sweet they are. 1 tbsp apple cider vin will give you that zip. white vinegar is stronger tasting...use your judgement)
- 1 tsp liquid smoke (if you've never used it, it might sound crazy. see the picture to the right - that's what it looks like when i get it from whole foods - it's all natural and vegan, and it adds that smokey flavor you would otherwise find in bacon, smoked salmon, jerkeys, "hickory" flavored things, etc)
- 1 cup ketchup
- 1 tbsp mustard (any kind, don't stress - yellow or dijon, etc)
- 1 cup water
- 1 cup TVP (do I have to say it again? textured vegetable protein - bob's red mill brand from whole foods - crazy cheap and awesome. refer to the fauxlognese sauce posting for detailed description)

what to do:
1. prep prep prep. mince your garlic, chop your onion and pepper, pop the tops off your seasonings, get your ingredients and measuring cups/spoons out for easy measure and dumping in the pan. it'll go pretty fast.
2. get a large pan (note: you want it to have a lid, so if you have to use a pot, that's ok too...btw: pan - shallow, think frying an egg. pot- deep, think making soup) heating over medium fire, add your oil, onion, bell pepper, garlic, black pepper and paprika. bring all that to a simmer - so your "medium" heat is right when your hearing "ssssssss"(that's hissing) and your onion's getting translucent (not brown) and your garlic should not be burning. the oil will combine with the seasonings and the pan will seem a little dry, it's ok. let that go for about 5 minutes.
3. add the beer to deglaze the pan (loosen up all those dry bits of seasonings and goodies from the pan) it's going to sizzle and pop at first, stand back a little. let that sizzle for a minute.
4. add everything else - liquid smoke, vinegar, ketchup, mustard, water and TVP
vegan joe on some 9 grain bread with a lil salad = heaven
5. mix all ingredients well, cover and let simmer for 15 minutes, stirring every 5 minutes - the TVP should be absorbing almost all the liquid by the end of the 15 minutes (a little liquid in the bottom of the pot is perfect) if it's soupy at the end of the 15 mins - let it simmer with the lid off until that liquid reduces. if it's bone-dry 5 mins into the cooking - just add 1/4 cup water, stir, make sure your lid's on and continue cooking. it's not a big deal - you can do this.
6. as always, taste it - like it? great. if not, adjust to your taste. the only thing i can't think of how to fix is if there's too much vinegar - so that's why i warn that my 1tbsp of apple cider vinegar does make it a bit zippy! but it's so good with the sweetness and smokiness!


hints:
-double this recipe - because it's delicious. i like making this for parties and serving it on mini whole wheat buns as a finger food. a tray full of these little gems= best. party. ever.

- if i make the joes a little less vinegary, they end up being very sweet and smokey, and i like to make a rice wine vinegar asian cole slaw to put in the sandwich. if i make the joes zippy as above, i use the silken tofu ranch to make a traditional cole slaw and add that to the sandwiches. soooooooo good.

- sure you could get pre-made sloppy joe mix, but this is homemade, super healthy, easy and cheap - and you don't have to take time browning meat before you make it. the TVP soaks up the flavors and is so freakin' low in fat and high in protein. seriously. TVP - i heart you.

nutritional info:
recipe yields about 2 + 1/2 cups. the following is info per 1/2 cup:
calories: 161
fat: 2.9g
saturated fat: 0.2g
cholesterol: 0mg
sodium: 549mg
carbohydrates: 19.3g
fiber: 3.7g
sugar: 9.4 g
protein: 9.9
vitamin A: 1%
vitamin C: 46%
calcium: 7%
iron: 13%

Tuesday, March 22, 2011

silken tofu "ranch" dip/dressing

this ain't no hidden valley, this here goodness is in plain sight...

i know - how many more uses can i find for this damn silken tofu?! you have no idea...actually i don't either, i just keep playing with it and look what happened - a redemption for the much-mocked ranch dressing i lampooned in last week's post. (but at $2 a package - this tofu is such a cheap, healthy, versatile ingredient!!) make no mistake though - this is not your mother's ranch. no mayo, no milk, no sour cream...and no over-priced "flavor packets". this is healthy, quick and you know exactly what goes into it - no mystery preservatives or additives. we're going to use some basic seasonings you likely have in your pantry, our food processors, and yes, my much beloved silken tofu and in less than 5 minutes, we'll have healthy ranch dip or dressing. i bet you could even have your kids all smiley and children-of-the-corn-like eating their veggies with this just like in that creepy ranch dressing commercial on tv...creepy kids...

ingredients:
the tofu you never knew you'd love

- 1 package (12 oz) silken tofu (i prefer the "firm"for dip, and the "soft" for dressing)
- 1/4 tsp salt 
- 1 tbsp + 1 tsp galaxy vegan grated topping
- 1/2 tsp dried basil (see the last "hint" for possible seasoning substitutions - you don't have to run out & buy these just for this!...though these are pretty common, multi-tasking herbs to have)
- 1/2 tsp dried oregano
- 1/4 tsp celery salt
- 1/4 tsp fresh ground pepper
- 1/4 tsp red pepper flakes (optional - definitely adds a little kick, but isn't "hot") 
vegan "parm"
- 1 + 1/2 tsp apple cider vinegar (or lemon juice if you don't have the vinegar)
- 1/4 tsp garlic powder (i know i always say to use fresh, but this isn't going to be cooked and fresh garlic completely overwhelms this dip)

what to do:
1. prep? what prep?  get all your seasonings out and pry those stupid shaker tops off so you can get a measuring spoon in there. plug your food processor in and cut your tofu box open.
2. put everything in your processor. blend it until very smooth.
3. taste it - like it? if not, adjust your seasonings, though be aware that if you let it set in the fridge the heat from the pepper will develop a little more.
4. refrigerate and use for up to a week in a sealed container.

hints:
simple party platter - homemade pita chips & veggies
-remember, when you make it and taste it on a spoon, that's not exactly how it's going to taste as a dressing or dip. dressings especially get diluted once they're tossed in a salad - so go ahead and make it, taste it, and let it sit for at least a couple hours before you use it - taste it again prior to serving, add anything you think might be a little lacking. don't be afraid to tinker with it! (i think this dip/dressing gets better when it sits overnight - the seasonings rehydrate and really come out more.)

- enjoy this with veggies (baby carrots, celery, broccoli, cucumber) or pita chips, tricuits, whatever healthy, savory snack you want.

- if you use the soft tofu this comes out more like a dressing consistency, so it's really up to you which you use. i like the firm because it's more scoopable for snacking. 

- this recipe is great to make and keep in a sealed container in your fridge as dressing for your week's salads!

-i think the seasonings listed are pretty common ones to have, but if you don't have them here are some alternatives: sub thyme for either basil or oregano (don't do all only thyme). if you don't have much of a spice cabinet, do you have some generic, ambiguous "italian blend"? instead of the basil and oregano - add 1 tsp of that. (herbs de provence also works well - we can make it work with minimal purchasing, i swear!) note that with these alternative you still want to add the garlic powder. oh, and now that i've preached always having fresh garlic on hand, if you don't have powder, you can use 1 tsp of the jarred, minced garlic. this ends up pretty garlicky even with the powder...maybe not a first date snack.

- idea - i admit i haven't tried this...i just had a brainstorm - someone try using this to make a pasta salad instead of mayo! i bet it'd be good! just another example of how you can think outside the box and make everyday foods healthier and still delicious!

nutritional info:
yields about 1 + 3/4 cups dip, info per 1/4 cup:
calories: 34
fat: 1.3g
saturated fat: .2g
cholesterol: 0mg
sodium: 136mg
carbohydrates: 1.5g
fiber: .1g
sugar: .6g
protein: 3.9g
vitamin A: 1%
vitamin C: 0%
calcium: 3%
iron: 3%

Tuesday, March 15, 2011

super simple hummus...or is it hommos...or hummos?

beans, beans, they're good for your heart.
      the more you eat...
             eh i forget the rest of that rhyme.
you know what makes it a lot easier to eat your veggies? dip. wait a minute! that sour cream/mayo stuff with a ranch dressing seasoning packet doesn't count. eating 5 baby carrots and a celery stalk does not even begin to justify that crap - those kids in the hidden valley commercials only look so happy and healthy because they're too young for the heart disease to have set it - give them time.
solution: i love that hummus has become so mainstream these days!  but now that it has, we get to demystify it. yeah, it's no longer an exotic dish from afar...it's that yummy snack you're overpaying for at every grocery store and food & liquor store (yup, seen it there too) i'm going to give you a recipe for really easy, cheap hummus at home - and once you see how simple it is, use the "hints" to turn this into any flavor hummus or even a different kind of bean dip!! (did your mind just explode? i know, brilliant - there's a money black bean dip idea in the "hints" - get on it)
note: you need a food processor for this recipe - though you could probably use a blender instead. there's just more stopping and starting while you scrape down the sides of your blender - the way the blades are set up it will naturally splatter the ingredients up onto the sides until it's smooth enough to "churn" around the blades. 
take 10 minutes at home to make this and get way more bang for your buck and steer clear of accidentally eating hundreds of calories and more fat than you think with those commercial brands (come on - 2 tablespoons is a serving?! get out of my face)

ingredients:
- 15 oz can of chick peas (or garbanzo beans, yes, same thing) doesn't matter what brand
- 1/4 cup the liquid from the can the beans came in (it's just starchy, salty liquid - don't be creeped out)
- 1/4 cup lemon juice (as always - fresh is best! it'd translate to the juice of 1 or 1&1/2 lemons - not a big investment, but way more flavor than concentrate, bottled stuff)
- 1 tsp minced garlic (same thing - fresh is better, you could use jarred/minced garlic or just cut 1 clove of garlic in quarters for this)
- 1/4 tsp salt 
- 1/2 tsp black pepper (fresh ground adds way more flavor than the ground stuff from a shaker)
- 7 kalamata olives (optional - this is the "flavor" of this hummus. i used the jarred ones from Trader Joe's, they'll keep for a long time in the fridge so you can use the leftovers later)

what to do:
1. prep - get your food processor out and assembled, squeeze/measure your lemon juice, grind your pepper (hint - if you're using a grinder and want to measure your pepper, grind it onto a piece of paper. you can fold the piece of paper and pour it into your measuring spoon) open your can of beans and  (use your can opener almost all the way around - leave a little bit of the lid attached, it'll be your "hinge" so you can use the lid to keep the beans in but pour the liquid out in to your measuring cup)
2. put everything in your food processor. 
3. process the food.
        seriously, that's it. blend it until you get that smooth consistency of commercial hummus. it will happen! if it's a little gritty, it's not done, i promise it will get to that creamy point if you stick with it. it may take 2 minutes of that annoying, high-pitched blending motor sound, but it'll happen. you may have to stop and scrape down the sides of your food processor to get some splattered ingredients in the mix. 
4. taste it. like it? if not, fix it. little salt, pepper, etc.
with some snow peas & baked tortilla chips: perfection


hints:
- this recipe is really cheap. a can of chick peas, on average, is 89cents, and a couple lemons- about $1. compared to commercial hummus which would be about $3-5 per container. the "flavor additions" will likely be the pricier items here. but keep in mind, you should be able to buy them and get multiple uses out of them! see the next "hint"...

- don't like kalamata olives? first off - what's wrong with you? second - that's ok! they're included in this recipe as an example of how easy it is to use one simple key ingredient to add a ton of flavor to a basic hummus. note that olives are really salty and briney, so if you chose not to use them, you may need to add a little more salt - always make the hummus as the rest of the recipe lists, adding any other flavor you want and tasting it in step 4 prior to adding more salt.
other examples of great additions: 
sun-dried tomatoes (some come already moist and ready to use, otherwise, if they're still hard-dried just follow the simple steps on the package to rehydrate - which is usually putting them in hot water)
3 fresh basil leaves and 2 tablespoons of galaxy vegan parmesan topping (or regular grated parm) what to do with the rest of the basil you bought for this? they make a ridiculously good addition to any pasta sauces!
2 chipotles canned in adobo sauce - these are soooo good and add a smokey, spicy flavor! i usually find these in the generically labeled "hispanic foods" aisle - be careful as they can add quite a bit of spice
roasted red pepper -remember, you learned how to make one the spanish rice blog from february!! look how handy that is now, you're so empowered!

-try other flavors! what are your favs that you buy pre-made? a bet you could do a pretty good job replicating it for less $ - if you want, let me know and maybe i can toy with the concept for ya...but i bet you could do it on your own!

-you may be wondering why my hummus recipe doesn't include tahini or olive oil...well, tahini is expensive and both of those ingredients add a significant amount of fat. don't get me wrong - both add healthy fats, but i'm just not the type to sit down and measure out the 2 tablespoon serving size of hummus...it typically ends up being half a cup nosh session! and no matter how good those calories are for you...it just adds up to a lot of them! i don't really find my hummus to be lacking because i don't use tahini or oil, the consistency is made by the can liquid & lemon juice and the flavor isn't lacking as long as you season it well (which is also why i really think you should use fresh lemon, pepper and garlic - they're so bold and rich!) 

-also feel free to try other beans! yeah - true story. just take note - chick beans are some of the hardest or driest beans i've used. meaning, if you want to make black bean dip, don't add all that liquid or you will have bean soup. black beans, kidney bean, cannellini beans, pinto beans - they are softer and will add more moisture on their own, so start off adding half as much liquid and blend - adding more liquid as needed. 
-cannelinni beans (white kidney beans) are delicious with the basil/parm idea!
-black beans turn into a delicious dip with lime juice instead of lemon, and a teaspoon of cumin. this is one of my favs! after blending it i like to add some chopped onion, cilantro and tomato. don't sweat the details - just try it. mmmmmm...

nutritional facts:
the kalamata recipe yields approximately 1&1/2 cups of hummus. we're calling 1/4 cup a serving. info per service:
calories: 72
fat: 1.9g
saturated fat: 0
cholesterol: 0
sodium: 321mg 
carbohydrates: 11.3g
fiber: 2.7g
sugar: 1.4g
protein: 3g
vitamin A: 0%
vitamin C: 8%
calcium: 1%
iron: 4%  

Tuesday, March 1, 2011

minimal effort, cheese-free veggie lasagna

lazy veggie lasagna
for this concept i broke it waaaaay down for you. i went by trader joe's and spent $8.54 for almost everything i used in this dish (minus the TVP, vegan "parmesan" and garlic - but if you've made any of my previous recipes, you already have these items at home! if not, shame on you - i'll note where to find them as well) my "prep" mainly consisted of opening a couple cans, a box and a bag, then layering. it took me a little longer as i was making it up as i went, but you could put this together in 15 minutes, then you bake for 40 mins. boom. done. for how healthy and yummy this recipe turns out, it's so simple! i really think i found a new staple meal for myself. taste-tested (devoured) by myself, my beau Skyler and roommate Abby - we all agreed: yum...then we ate more...then we sat back feeling indulged (stuffed) but not the least bit guilty or greasy...hey, we were just making sure we thoroughly tested it for you!
note: this recipe would be entirely vegan if it weren't for the lasagna noodles. the specific ones i used from trader joe's have egg in them - but they are the only ones there. i'm sure you could find lasagna noodles in any grocery store, and most dry pastas are dairy-free (if you look elsewhere you could also look for whole wheat or brown rice pasta - bonus points!) you would just need to boil them before using them in this dish.

ingredients:
-12 trader joe's no-boil lasagna noodles: ends up being about 1/2 the package so you have enough for next time too!
- ~3 cups frozen, chopped spinach - i got a 24 oz bag and ended up using about 1/3-1/2 the bag. i measured it while still frozen. don't stress exact measurements - you want enough to sprinkle a full layer for your lasagna, but note that you will be thawing it and squeezing some of the liquid out, it deflates!
-canned black olives - get a full size can and slice about 3/4 of them (enough to make a layer - you decide) this ingredient could be seen as "optional" if you hate olives (weirdo). but if you're on the fence, go for it! they add a great salty favor.
-2   28 oz can trader joe's marinara sauce note i changed this to 2 cans - see the first "hint" for layering/sauce tip!!
-3/4 cup red wine (if you do not imbibe, use vegetable broth, just don't use all water - unless you compensate by seasoning the sauce extra as in the "hints")
-1/4 cup water 
-3/4 cup TVP - remember this stuff? Textured Vegetable Protein. bob's red mill brand from whole foods. comes in a bag, looks like grape nuts. baking aisle. we used it in the fauxlognese sauce.
-1 container trader joe's firm tofu (i swear it's going to be good)
-1 clove garlic minced or microplaned (i'll talk about that, don't worry)
-1/2 tsp salt
-2 tbsp apple cider vinegar (you could also use lemon juice if you don't have this, but i like the vinegar)
-1/4 cup galaxy nutrition vegan "parmesan" topping - remember this stuff? purple container, whole foods italian/pasta sauce aisle, we used it in the spinach/artichoke dip.
-another 1/4 cup galaxy vegan topping to top your lasagna prior to baking


what to do:
1. i usually make step 1 all your prep...in this case...preheat your oven to 350 degrees...slice your olives...open your cans, open your pasta box...snack on an olive? have some wine!
2. in a medium saucepan, combine one can of your marinara, red wine, water or broth and TVP (we're essentially making the lazy version given in the "hints" of our previous fauxlognese sauce) cover and bring to a simmer for 10 minutes over a medium heat. see "hints" for tips on jazzing up your sauce with minimal effort.
note: if you're on point, you could seriously get the tofu and spinach ready by the time your sauce is done! it's ok if it takes a little longer, but if it takes much longer - you're over thinking it! loosen up.
3. while your sauce is simmering, thaw your spinach in the microwave - 1 minute, stir, 1 minute, stir. once it's all thawed, squeeze some of the liquid out over a bowl in your sink - there's no "trick" to this, literally grab the spinach in your hand and gently squeeze. it's best to leave most of the liquid in the spinach as the moisture helps the pasta cook through in the oven, just squeeze enough liquid out so it's not sitting in a puddle.
4. open the tofu container, remove the chunk of tofu from the "brine" it's stored in (dump the brine). in a large bowl, crumble the tofu with your hands. add the 1/4 cup vegan "parmesan", 1/2 tsp salt, 2 tbsp apple cider vinegar, and the garlic. if you have a microplane (teeny tiny grater) use that to "grate" the garlic so it'll mix into the tofu. if you don't have a microplane but feel comfortable with a knife - keep chopping that garlic until it's pretty much paste! If you don't feel comfortable with either of those options, you can use a tsp of powder garlic. (fresh is always better)
my gorgeous hand and tofu from step 5
5. using a fork, mix that tofu until you have what looks like chunky, crumbled feta. it's ok fine if it's inconsistent! you don't want tofu "paste" and you don't want chunks any bigger than a grape - otherwise that's a big piece of tofu that doesn't get the flavor mixed into it. here's my tofu:
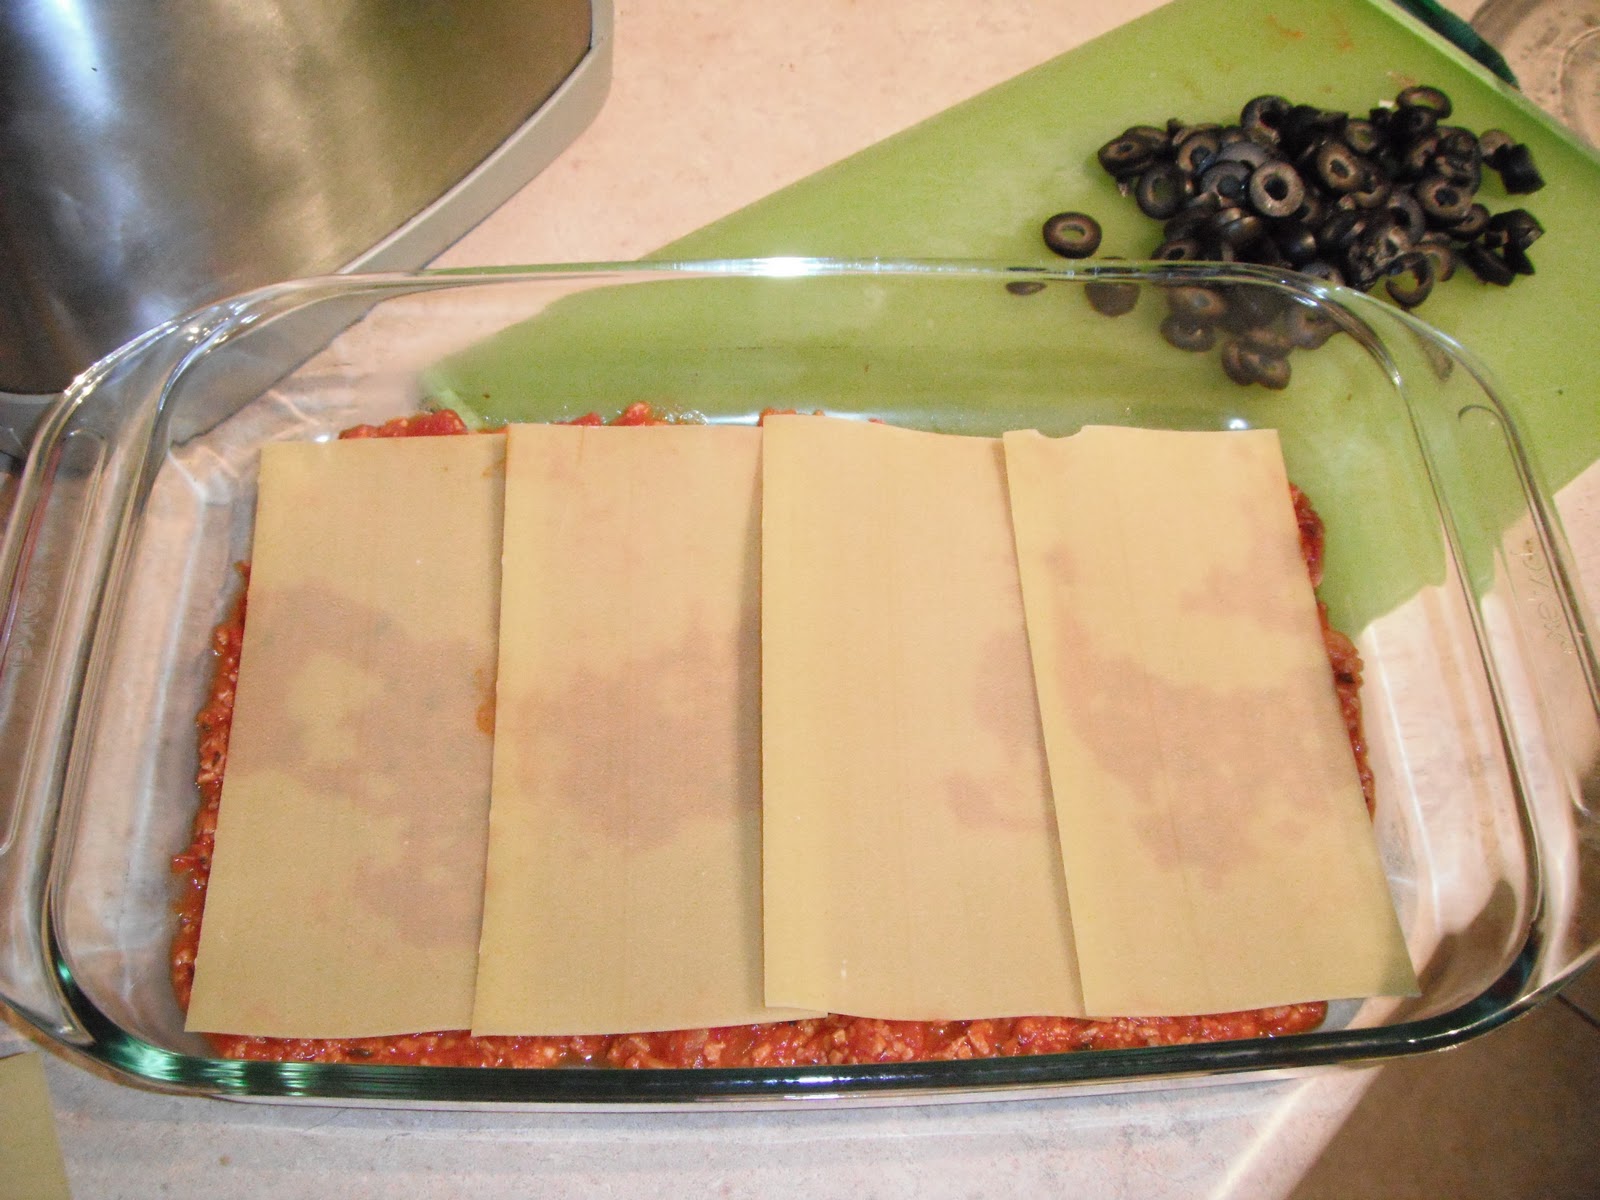
6. by now, your sauce is done, you spinach is ready, your tofu is tasty - it's time to build this thing. get your casserole pan out (who makes casseroles anymore, btw?) and layer the ingredients as follows (i'll post a couple pics, by those, you should get the general idea) seriously, i don't know exactly how big the pan is...it's the typical...9x12? you know, a casserole pan!


first layer of sauce and noodles, step 6
- pour and spread ~1 cup of you fauxlognese sauce into the bottom of the casserole dish (should be a little less than 1/3 of all your sauce, may seem a tad sparse, it's ok)
- layer 4 noodles
- sprinkle half of your tofu mix
- scatter your spinach
- 4 more noodles
- spread a little more than ~1.5 cups sauce (half of what's left)
- sprinkle your olives like salty confetti
- use the other half of your tofu
- 4 more noodles
- the rest of the sauce (should be a little more than 1.5 cups)
- sprinkle the other 1/4 cup "parmesan" on top
tofu and spinach join the party, step 6


7. cover your pan tightly with tin foil. put it in the
oven for 40 minutes. after that, take it out, be careful, it's hot as hell! uncover and let it cool for 15 minutes then cut into that baby and enjoy responsibly with the rest of that red wine you cooked with (that's why we only used 1/2 cup, mama needs her medicine)

hints:
-you only used 1 can of the marinara sauce to make your fauxlognese!! use the other can at your discretion to ensure you have enough sauce while layering. the top layer of noodles especially needs to be covered or they'll stay dry & hard. yuck. spread that sauce, and make sure there's a little sauce down in the sides of the pan surrounding your lasagna, not just in between the noodles. get those edges moist! trust yourself, don't overthink it - if you err on the side of a little too much or too little sauce...either toast a piece of hearty bread to sop some up, or you can pour more on when it's done - no biggie i swear, and no matter what, you'll learn what's best for you for next time you make it! you shouldn't have to use that whole other can of sauce, the leftovers can be dipping sauce for some garlic bread or you make some easy fauxlognese sauce and freeze it for a quick-fix meal later)
finished! sorry, no pic of it plated nicely, i lost focus & started eating

-with any of these ingredients, you don't have to use the trader joe's one i listed, but i wanted to show you could go to one place, get some cheap stuff, along with a couple pantry items (tvp, parm, vinegar) and make an awesome meal.

-your sauce: you can use the canned sauce i got (very cost effective and really god!) or your favorite marinara, make the fauxlognese sauce i list in a previous blog, or you can always jazz up the sauce i used. i highly recommend adding 1/2 tsp black pepper & 1/2 tsp red pepper flakes at the start of step 2, it won't make the entire dish "hot" but adds a little dimension and warmth to the dish. whatever you use - taste your sauce! it's the best way to infuse this dish with flavor! add some garlic, basil, oregano, etc. have a little fun (just stick to the "italian" flavors)

-this is not an attempt to make ricotta cheese out of tofu! the tofu almost ends up tasting like a saltier, sharper cheese, like a hybrid of feta and parm. whatever, it's yummy and so dang healthy. if you want to be a little more indulgent, you could add 1/2 cup of daiya vegan cheese (found at whole foods) or a low fat dairy cheese to a layer, but i recommend trying it without first. branch out and try a lasagna that's flavorful and satisfying and you don't have to rely on a pound of cheese!

-the TVP adds a lot of protein, of course if you don't want to try it, you could brown some ground turkey (turkey to keep it healthy) and add that to the sauce, but to be honest, the TVP makes it a lot easier, and it's shelf life in it's dry state is...forever! So you'll hear me say it again and again - buy a bag, have it on hand!

-interesting point - i had a friend ask if she could make this dish the night before, then bake it the following day. here's the thing, i found this dish is best the day it's layered because the longer it sits, the more flavor saps from the tofu. remedy: if you want to save time, go ahead and prep your fauxlognese and tofu the day before - the longer those have time to marinade/sit, the better! but once you layer it, try to make sure you bake it off and serve it that day. not that it's a bad thing if you do have leftovers! but note that it will dry out a little in the microwave - make sure you cover it when zapping (i just flipped a bowl upside down over it on my plate)

nutritional info:
this yields one full dish, we'll say it's 8 servings
info per 1/8 of dish (recipe as listed, no substitutions or extra sauce as listed in "hints":
calories: 268
fat: 5.8g
saturated fat: 1.3g
cholesterol: 22mg
sodium: 850mg
carbohydrates: 31.5g
fiber: 5.3g
sugar: 3.3g
protein: 18g
vitamin A: 48%
vitamin C: 23%
calcium: 24%
iron: 20%

Tuesday, February 22, 2011

be smarter than the box - convenient baking made healthy!

oh dear god, i wrote at least five intros for this week's entry - really, life shouldn't be this hard, i might be overthinking this one...
we are going to go over a specific recipe to utilized my favorite boxed muffin/bread mix from trader joe's. doesn't sound earth-shattering, huh? by going over this one recipe, i hope to open some minds to the concept of taking advantage of boxed mixes...but saying "to hell with" the directions and making yourself some seriously healthy, delicious, convenient and cheap muffins for the whole week. once you see it work with this mix, start to branch out and experiment with others.
i've long since realized there are baking mixes out there that are pretty darn healthy and even vegan!...until you look at the directions and they tell you to add 2 eggs and 1/2 cup of oil and milk...don't you love how the nutritional info for the mix alone looks great, then they have the "prepared" info next to that, and that looks like crap? those are the 3 items we are going to conquer - oil (or butter), egg and milk - there's a replacement for each of these fatty items that will blow your mind (and make this whole recipe healthy and vegan!) keep these items stocked in your home and you get the ease of the mix, but the healthy ingredients and homemade vibe (and it's breakfast for a week - so cheap!!) - i'm telling you, it is, in fact, kinda earth shattering.

ingredients:
-1 package trader joe's spiced apple bread mix
-2 tbsp flax meal, mixed with 6 tbsp lukewarm water - used in place of eggs
(see "hints" bellow for flax meal tips)
-4 tbsp unsweetened applesauce - used in place of oil
-1+1/4 cups plain soymilk - used in place of dairy milk (or lowfat dairy milk, or almond milk)
-1/3 cup oats, blended in food processor (yup, just plain old oatmeal oats)

what to do:
1. get your oven preheating to 400 degrees and get your little paper muffin cups in your muffin tins.
2. in a small container, mix the 2 tbsp flax meal with the 6 tbsp water - do this first so it gets time to set while you prep the rest of the recipe. you'll notice when you go back to use it in 5 mins, it's turned to a goo...perfect.
3. blend the oats in your food processor. you want them broken up, but they don't have to end up as fine as flour. the point to this addition is that it bulks your recipe up a little (it's sweet enough, it can stand being diluted a little) adds some fiber, and gives your muffins a chewier, heartier texture. the larger you leave the oats, the chewier and more noticeable they'll be...though if you were to leave them whole, they're a bit too chewy if you ask me.
4. combine the oats and muffin mix in a large bowl.
5. add the milk, flax and applesauce - mix but don't over-mix. don't you hate when it says that? mix it until everything is just combined - no big flour deposits, etc. the thing is - the more you continue to mix it beyond that, the tougher your end product will be. and keep in mind, you're going to be "mixing" it a little more when you spoon it into the muffin tins, so take it easy - nice big combining swirls of the spoon or spatula.
6. spoon mix into your muffin tins/cups. fill them 3/4 of the way, so pretty close to the top, just make sure they're not right up to the brim. should fill around 14 average muffin cups (real muffin size, these are not going to be gigantic coffee shop monstrosities)
7. bake them for around 20 mins. take them out at 20 mins and stick a clean knife straight down into one - if it comes out clean, you're done.
8...your done. don't forget to turn your oven off so you don't burn down your home, take the muffins out of the tins to allow them to cool faster. store them in an airtight container unrefrigerated and they'll be good for 5 days or so, refrigerate them to keep them for an entire week. you made about 14 so have 1 for breakfast and take 1 to work for a healthy snack and the timing is perfect for your week.

hints:
-as promised - let's chat about flax meal - it's ground flax seeds, so it's got heart healthy fats - better than the cholesterol-heavy eggs they replace in baking and provides the gooey texture your recipe needs. go ahead and get a bag of it - you can use it in any other muffin mix in lieu of eggs (just refrigerate it after opening the bag). it can add a very slight nutty flavor  to lighter recipes like blueberry muffins - hardly noticeable and it works! i even use it in chocolate chip cookie recipes...but that's a whole other entry! buying that 1 bag will probably run you ~$6, but it will last a while!
the general rule is: 1 tbsp of flax mixed with 3 tbsp water = 1 egg
if for some crazy reason you don't end up liking this easy baking idea, flax is still really good for you - to use it up, add a tbsp to your oatmeal in the morning (omit any butter...come on, be good)
this may be dumb, but i have to say - obviously, flax is only used to replace eggs in baking...scrambled flax goo does not work for brunch.

-note - in this recipe i use applesauce instead of butter - obviously the flavor blends into the whole concept of the spiced apple muffin! trader joe's also makes a great banana bread mix that i make muffins out of, so i use a ripe, mashed banana instead of the oil the box calls for...see how this whole creativity thing works?!?! these are viscous, moist items so they serve as good fat substitutes. i've also done canned pumpkin in spiced recipes. here's how the banana bread recipe would look:
   -1 box of trader joe's banana bread mix
   -2 tbsp flax + 6 tbsp water - in place of 2 eggs
   -1/3 cup mashed banana - in place of 1/3 cup oil
   -3/4 cup water or soymilk - in place of 3/4 cup water
this is a sweeter mix also, so you could add the 1/3 cup oats and increase the milk/water to 1 cup

-both of the mixes i recommend are from trader joe's, i like them because they are really affordable, delicious and the mix itself is vegan. they are both "bread" mixes, but end up making good, hearty muffins - no, they're not going to be like the fluffy, super sweet, cupcakey, buttery "muffins" you might buy in a cafe...but did you hear those adjectives?! yeah, you shouldn't be eating that as breakfast. bonus - these muffins end up being smaller portions and very light calorie/fat wise, so you get to round out your breakfast by smearing a little peanut butter on one, grabbing and apple and having your coffee as well, with no guilt! (by making them in muffin cups they're pre-portioned for better control, and they travel easily, so you can grab and go in the morning)

nutritional facts
this spiced apple recipe yields about 14 muffins, so per muffin:
calories: 134
fat: 0.8g
saturated fat: 0.1g
cholesterol: 0mg
sodium: 328mg
carbohydrates: 29.3g
fiber: 1.5g
sugar: 13.8g
protein: 2.8g
vitamin A: 1%
vitamin C: 0%
calcium: 5%
iron: 7%


Tuesday, February 15, 2011

"spanish" rice...? smokey, tomatoey, black bean, corny rice?

this spicy, smokey, hearty, healthy recipe is a great example of what i like to call "one-stop meals" - i'm a busy gal, so by the time i get home in the evenings i'm hungry and need to have an accessible meal solution ...or else i start "grazing"...not the healthy grass kind of grazing, i'm talking "i'll grab a handful of chips...or two...and a pickle, and some carrots while i decide what to do for dinner" fast forward 15 minutes and i'm awash with self loathing and my appetite's ruined.
solution: as always, this recipe makes several portions and can easily be refrigerated and reheated in the microwave. more importantly though, this dish can be a satisfying, healthy and well rounded meal with a salad or can serve as a side dish. see the "hints" after the recipe for more tips on serving this.
warning - the first step is leeeengthy, but you're learning to roast a red bell pepper and i want to make sure nobody gets intimidated.

ingredients:
- 1 carrot, diced (or about 6 baby carrots, diced)
- 1/3 red bell pepper, roasted and diced (i'll explain, you can do it! be brave!)
- 1/2 medium onion, diced
- 1 celery stalk, diced
- 3 garlic cloves, diced (again, worth it to get fresh garlic or sub 3 teaspoons jarred, pre-diced garlic)
- 1 tbsp olive oil
- 1 1/4 tsp salt
- 1 1/2 tsp ground cumin
- 1 1/2 tsp smoked paprika (there's plain paprika, sweet paprika, hungarian paprika, but i live and die by smoked paprika. i see it in all "regular" grocery stores but only in McCormick brand - so it's a little pricier, but dear god it's a major addition to any dish it's in)
- 1/4 tsp cayenne or red pepper
- 1 tsp black pepper (i like this dish a little spicy, if this scares you, reduce black pepper in half then taste it later and adjust if needed)
- 1/4 cup red wine (adds another level of flavor, but isn't necessary for the dish to work)
- 2 cups crushed, canned tomato
- 2 1/2 cups water
-1 1/2 cup brown rice (i use medium or long grain, it's less starchy than short grain and this dish is going to be moist anyway, so we don't need extra starch gooping it up)
- 1 can black beans, drained and rinsed
- 3/4 can corn
- juice of 1 lemon
- 1/4 cup chopped cilantro (fresh lemon and cilantro?! i know, i'm asking a lot, but at ~30 cents a lemon and 99 cents for a big bunch of cilantro, it's worth it)

what to do:
1. first step is always the same: get your prep work out of the way - but now we have a new piece of prep so this is going to be lengthy -
 roasting a red pepper!! don't be intimidated - take a couple minutes right now and we'll conquer the concept. you only need  1/3 of the pepper so slice it length-wise (from stem down to the "butt" or belly button) now you have one long, kinda wedge of pepper. turn your stove burner on full blast (sorry, you have to have a gas stove) and lay the pepper wedge skin-side down on the grate over the burner where you would normally put a pot or pan. don't stress, it's counter-intuitive, but let the pepper char, moving it with a pair of tongs or a long fork so all the skin turns black and papery. remove it from the fire once the entire skin side is black - the flesh side shouldn't have changed much visually, but you'll notice now the pepper is floppy and softer. set this aside to cool for a couple minutes. once you can handle the pepper, take a paper towel and wipe that thin, burnt skin right. just nice, confident long wipes - you don't need to "scrub" it off. make sure you get it all off (there may be some tiny flecks, you'll live) just don't run it under water to get the skin off, or you're washing off those natural oils and flavor. 
you just roasted a pepper. look at you.
 back to prep: measure out your spices and put them in a dish together, dice all your veggies (including roasted pepper and garlic). until now it hasn't really mattered what size you cut stuff - we blended the pasta sauce and the dip just mushed together - this time, think about the consistency of the dish - what are the sizes we are working with? rice, beans and corn - so try to roughly get your veggies a little bigger than that as they'll cook down a bit.
2. get a medium sauce pan over a medium heat, add the tbsp olive oil and all your veggies and garlic. saute these for 5 minutes or so until the onion and celery are getting translucent. (some sizzling is fine, we just don't want things browning - if they are, turn your heat down)
3. add all of your seasonings and saute another 5 minutes. your veggies should have cooked down significantly and your pan should be getting a little dry from the seasonings - that's ok, as long as nothing is turning black
4. add the red wine and stir a bit so all those dry seasoning bits and veggies get up off the pan - let that wine sizzle and pop for 2 minutes.
5. add your tomato, water and rice, turn your fire up to medium/high. stir everything together, and let it come to a boil.
6. let it boil for a couple minutes then give it a final stir to ensure nothing got too hot or stuck to the bottom of the pot, put the lid on and reduce your heat to a low flame. ("kc, what does 'low' mean?" well, you still want your stuff to be simmering but not boiling. so you want the tiny "blub blub blub" bubbles and sound, but the whole contents shouldn't be rolling or turning by boiling)
7. listen to me: leave it alone. let it gently simmer for about 25-30 minutes. rice works best in a private setting...so quit with the peeping tom act, just leave the lid on. 
8. after 25-30 minutes, open up, give it a stir and see where you are. rice not done and there's still watery liquid floating around? put your lid back on and give it another 10 minutes.  still liquidy but your rice IS done? leave the lid off and let it go for another 10 minutes. this is the beauty of using brown rice (aside from it being better for you than white rice!) - it's heartier so you're not in as much danger of over-cooking it.
9. check your rice again - it should still be a "moist" mixture, you're not looking for fluffy, well defined individual grains, but you don't want a bunch of runny liquid in your pan. look for that balance, but don't stress, ultimately - just taste the freakin' rice - is it done? then your done. stop it. 
10. once done, remove from heat and add your corn, beans, lemon juice and cilantro (optional for those freaks who "hate" cilantro) taste your dish and adjust salt and pepper to taste.

hints:
-this dish may seem a little more involved, a lot of little "add this, cook for 2 minutes, add that then 2 more minutes, etc etc) but you're building the flavor in those first 4 steps. this is why i say - get your prep done first! that way you can have everything out and ready so the whole process flows. dice all your veggies and have them in a bowl, measure your spices and have them in a little bowl, measure your tomato and water and have that in another container. makes for more dishes to wash, but if it keeps you from freaking out with measuring cups and spoons strewn on the counter and the veggies burning while you're trying to pry the stupid cap off your cumin...DO IT.

-this dish could be an entire meal - i like to eat a ~1 1/2 cups with 1/4 avocado diced on top. you could also serve a cup with a little grilled chicken and a side veggie for a fuller, more diverse meal.

-fresh cilantro is so good, but i understand if you're worried you'll buy a clump and only use part of it for this - i recommend chopping some of the remainder up and adding it to your store bought, jarred salsa along with the unused 1/4 can of corn - jazz that salsa up and seem fancy. you can of course also use bottled lemon juice in lieu of fresh...but fresh lemon juice really brightens the dish up and contrasts the smokiness well.

-when you dish some into a bowl and go to microwave it - cover it with a plate to prevent it from drying out. and if your rice came out a little drier to begin with, add 2 tbsp water and mix before reheating.

-the beauty of a dish like this is...nobody can tell you you're wrong. with the seasonings and measurements given, it will taste good (as long as your rice is fully cooked) so don't get too caught up on whether or not yours is the exact moistness it should be once the rice is done and the liquid's reduced - did it come out more like a thick rice stew? who cares, it's still good! is it a drier rice dish? as long as it's tasty.

nutritional facts: 
recipe yields about 7 cups, we'll say 1 cup is a serving. 
facts per cup:
calories: 279
fat: 3.8g
saturated fat: .3g
cholesterol: 0mg
sodium: 790 mg
carbohydrates: 52.9g
fiber: 6.8g
sugar: 4g
protein: 9.1g
vitamin A: 62%
vitamin C: 23%
calcium: 5%
iron: 17%


Thursday, February 10, 2011

bonus dessert post! crazy-easy chocolate tofu pudding

yes, i said it. dessert, tofu - same sentence. don't cringe. this tip is so quick i can't even call it an entire post so i'm throwing it in there as a bonus for this week - what can i say? i'm a giver. after you've made your pasta for dinner, take 3 minutes (literally, that's as long as this takes) and made this healthy treat to satisfy your sweet tooth.

ingredients:
-12.3oz firm silken tofu (remember, we discussed this - it's different than regular {not silken} tofu. get it at most grocery stores and whole foods, i usually find it in the produce or "asian" section)
-1/2cup unsweetened cocoa powder
-8tsp sugar (~1/6cup - i find this to be a good ratio, though i don't like my chocolate sickeningly sweet)
-1/4tsp vanilla extract

what to do:
1.put all ingredients in you food processor or blender (if using a blender i'd recommend getting soft silken tofu as opposed to firm, though i like the firm one - keep your comments to yourself - because it's a thicker, mousse/pudding consistency, the soft tofu comes out a little runnier)
2.blend until silky smooth - give it a minute, you'll see when it's completely smooth
3.measure it because i didn't. scoop 1/4 the amount for now, refrigerate the rest, eat as chocolate cravings deem necessary.

hints:
-i find the cocoa powder masks any "weird tofu" taste you might not like, so i recommend sticking with that flavor, but otherwise, play with the extracts! i like almond extract instead of vanilla, i bet coconut would be yummy, i've also used mint, maybe even orange...go wild, you maniac.

-though this is still a sweet treat (so don't eat the whole thing at once) it's pretty good for you - low in fat and contains heart-healthy soy protein. you can find buy low-fat/fat-free puddings, but at ~$2 per container of this tofu, this is more bang for your buck and those puddings usually have creepy stuff like aspartame and...things i can't pronounce in them.

-if you want to amp this dessert up to full-fledged snack status, when blending it, add a scoop of chocolate flavored soy-protein powder to it. keep in mind, when you do this it'll be sweeter so back of the sugar a little. the calories/sugar will increase, but the protein and vitamin/mineral profile will too - so in this case i tell myself it's ok to make a mini parfait out of it by adding 1/4cup of my favorite cereal (kashi go lean crunch)

nutritional facts: i didn't measure exactly how much this yields...i'd estimate around 2 cups, whatever it is, we are saying it's 4 servings. info per 1/4 recipe:
calories: 123
fat: 4.3g
saturated fat: 0.3g
trans fat: 0
cholesterol: 0
sodium: 30mg
carbohydrates: 14.1g
fiber: 2.1g
sugar: 9.1g
protein: 7.8g
vitamin A: 0
vitaminC: 0
calcium: 3%
iron: 9%